Severely overdue library items will appear on an “Overdue Item to be Billed” report at the times specified in the table below. Overdue recalled items will appear on a “Timetobill” report.
|
Format |
Days overdue |
|
General collection items |
55 |
|
Reserves |
15 |
|
Recalled items |
23 |
Each library has its own time frame on when to actually bill for an item.
The listing of an item in the “Overdue Item to be Billed” report is the last notification through daily reports to circulation staff that an item is severely overdue. If the circulation staff member chooses not to bill at that time, they are responsible for keeping a record and monitoring the future status of items which have appeared on the report.
Significantly damaged items can be immediately billed. Users who return damaged items can be billed for complete costs (current replacement cost + $35 cataloging fee + $25 billing fee) or for rebinding costs ($10).
Billing fees usually serve as “catch all” fees and are almost always non-refundable. For items that do not have overdue fines, the bill serves as a reminder to return items within a reasonable amount of time. They also are meant to cover the time staff members actually spend on billing (contacting users, modifying records, filling out paperwork for Student Accounts, etc.). Lastly, they can also be used to cover costs when binding replacements. Current practice is to waive billing fees for items lost when borrowed through ILL (See How to Bill ILL).
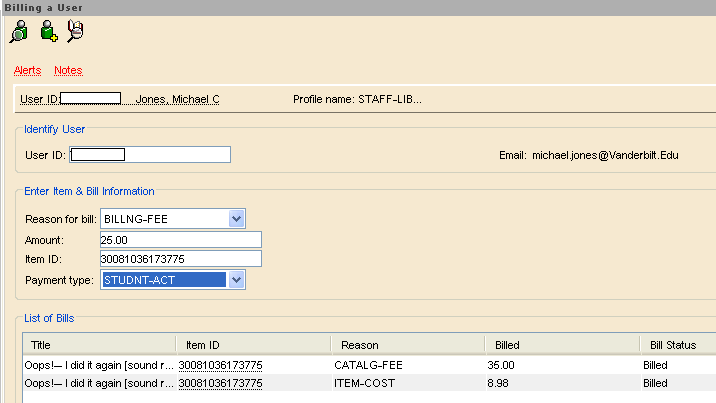
How to Bill Users
- Click on the Billing a User Wizard (under the Common Tasks box in the Circulation tab).
- Copy the patron’s user ID from the “TimeToBill” report and paste it in the User ID field. If choosing to look up the patron manually with the user search feature (
 ), make absolutely sure that you have the right user.
 - In the "Enter Item & Bill Information" section:
- When billing for the cost of an item:
- From the drop-down menu in the "Reason for bill" field, choose ITEM-COST.
- In the Amount field, enter the current replacement cost of the item (ex. 75.00, 13.95).
- Find the current replacement cost. This can be found at the publisher’s website or at major online booksellers such as Amazon. If the item is currently out of print, a replacement fee of $60 may be used for the ITEM-COST.
- In the Item ID field, paste or enter the item ID of the item associated with the bill.
- Click Bill User at the bottom of the screen.
- When billing for cataloging fees:
- From the drop-down menu in the Reason for bill field, choose CATALG-FEE.
- In the Amount field, enter the current fee for cataloging costs ($35 as of 5/2010).
- Follow steps 3 and 4 under 3A.
- When billing for billing fees:
- From the drop-down menu in the Reason for bill field, choose BILLNG-FEE.
- In the Amount field, enter the current fee for billing costs ($25 as of 5/2010).
- Follow steps 3 and 4 under 3A.
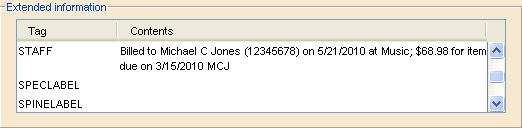
4. Information associated with billing needs to be recorded in the item record of the billed item.
- Click on the Modify Title Wizard under the Title box in the Cataloging tab.
- Click on the Call Number/Item tab.
- Under Extended information, record the following in the STAFF field (STAFF is used for comments that do not display in the public web catalog):
Billed to [user name] ([last 4 digits of user ID]) [billing date] [total billing amount] [staff member’s initials]
- Save changes at the bottom of the screen.
5. Discharge the item.
6. Charge the item to your library's “Billed” pseudo-patron.
How to Bill ILL
Billing an item to ILL is a slightly different process. The Interlibrary Loan department, not the owning library, determines when it is time to bill for an item. Communicate with ILL when a “Final Notice” is generated, and either offer a renewal of the item or determine if the item should be billed.
To bill ILL:
- Click on the Billing a User Wizard (under the Common Tasks box in the Circulation tab).
- The user ID for billing will be your library’s ILL pseudo-patron.
- Follow the step 3 instructions for billing users. Do not assign billing fees to ILL.
- Follow the step 4 instructions for billing users. For part 4C, enter the following:
Billed to ILL ([ILL transaction no.]) [billing date]; [total billing amount] [staff member’s initials]
- Follow the steps 5 and 6 instructions for billing users.
In the following day’s reports, a bill notice will be generated for the ILL pseudo-patron. Because ILL does not receive notices via email, this bill sent to the ILL department. ILL should also be notified if charges have been forgiven when an item is returned.
Paying User Bills
Bills or fines should only be paid or forgiven at a named workstation at a service desk.
To Pay a Bill:
-
Click on the Paying Bills Wizard (under Common Tasks in the Circulation Module).
-
Swipe the user’s Vanderbilt ID or look up the user with the User Search Helper (
). -
Enter paid amounts individually in the Individual bills and payments section. Entered amounts must be in decimal format: 20.00
-
Select payment type from the Payment Type drop-down menu(s).
-
Central Library is the only library with a credit card reader
-
-
Click on Pay Bills at the bottom of the window.
Forgiving Bills and Fines
-
Before forgiving any bill or fine, refer to your library’s policies on fine forgiveness. Before removing any fines, make sure that you have been authorized to forgive fines by your circulation supervisor.
-
Do not forgive any bills or fines from other campus libraries.
-
Follow instructions for paying a bill or fine, but select "FORGIVEN" as the payment type
Student bills and fines are transferred to Student Accounts by the 18th of each month. Bills and fines for all other users stay on their account until paid or forgiven.
PAYING ILL BILLS
Library administration will notify your library when ILL bills have been paid. Circulation staff should then pay the bills in WorkFlows using VOUCHERS as payment type. Edit the item record to reflect the paid status and the date.
Transferring Bills and Fines to Student Accounts
On the 8th of each month, a report of unpaid bills and fines from the previous month (FINOTICE) is produced for circulation staff at each library. The fine notice will be in roughly the following format:
[Alt ID/Previous User ID] | [User name] | |[User ID] | [Owning Library] | [Bill amount (2000 = $20)]|
Ex. 0001234567|Smith, Brad F|987645312|MUSIC|5000|
If any fines or bills have been assigned to user accounts that month and you have not received a FINOTICE, submit an Inform.
Student Accounts can only bill students (undergrads and grads). Bills and fines stay on the accounts of all other groups until paid. If amount owed exceeds $100, the account will be blocked.
The window for sending bills and fines to Student Accounts is the 10th-18th of each month. Each library should only be sending bills or fines to Student Accounts for items owned by their library.
To submit bills or fines to Student Accounts:
- Bills must be sent to Student Accounts from a named workstation.
- Under Common Tasks in the Circulation module, click on Paying Bills.
- Enter patron's User ID
- In the Individual bills and payments section, choose STUDNT-ACT from the Payment Type drop-down menus for each bill or fine. This can be set as a default payment type.
- Enter amounts from the Owes column in the Payment column. Entered amounts must be in decimal format: 20.00
- Click on Pay Bills at the bottom of the window.
A report listing fines sent to Student Accounts is sent to circulation staff by the 20th of each month.
Issuing Credits
Credits are issued via this form and staff must have authorization. If you don’t have authorization, the Public Services Coordinator of your Service Desk will need to submit an INFORM. Credits are only issued for charges that have been transferred to Student Accounts (Student Billing).
Once you bring up the webpage for issuing credits you will need to enter the following information:
- VUNet ID of Student:
- Credit Amt:
- Library (Select your library from the drop down)
- Term (Select the term that the charges were transferred)
- Comments: (add a comment as to why the credit is being issued, for Billed books it’s wise to add the item barcode. Ex: Billed book return 30081….)
Print out two copies – one for Library Administration and one for your files.
