Creating Title/Provisional Records
Faculty may supply personal materials (books, articles, media, etc.) to be placed on reserve.These materials will require the creation of a title record.
Provisional records are temporary and require minimal cataloging information.
To create a title/provisional record:
- Click on Cataloging tab.
- In the Title box, click Add Title.
- Cataloging Preferences should be preset.
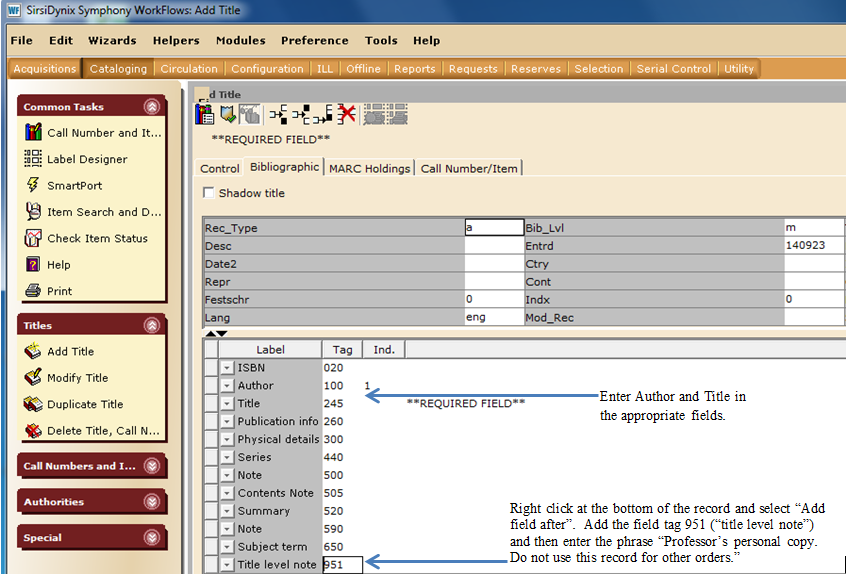
- In the Bibilgraphic tab, enter information into the necessary fields.
5. In the Call Number/Item tab:
- In the Call number field, enter a unique call number. Each library will have their own procedure for assigning call numbers to personal items. If you do not assign a call number, Library Catalog will automatically assign one.
- Choose a class scheme from the dropdown menu depending on your call number assigning conventions.
- Choose your library from the Call library dropdown menu.
- Make sure the Shadow call number check box is NOT checked.
- Select appropriate item type from the Type dropdown menu.
- Confirm the appropriate library from the Item library dropdown menu.
- Confirm the Home location from the dropdown menu.
- Make sure Permanent check box is unchecked.
- Check the Circulate checkbox.
- Scan the barcode in the Item ID field to save your work.

Add Copy/Item to Item Record
To add a copy to an existing item record:
-
Open the Add Item Wizard (under Items in the Circulation Module).
-
Search for a bibliographically matching title record (See Searching for Title Records).
-
When the record is retrieved, the Add Item window will display the Call Number/Item tab of the title record.If needed, choose your library’s call number.Click on Add Item at the bottom of the window.
-
In the Item Information section:
-
Choose the appropriate item type from the Type drop-down menu.
-
Choose the appropriate Home Location from the drop-down menu of the same name (Current location will be changed automatically upon saving).
-
If the item has loose pieces or parts, count those pieces plus the item and add that number to the Number of pieces field.
-
Affix a barcode to the item, place the cursor in the Item ID field and scan the barcode.
-
-
Click on Save at the bottom of the window.
